
Shaft Pull Process - Step by Step Guide
SPARGO GOLF'S PROCESS OF SELECTING AND PREPARING SHAFT PULL OUTS
Spargo Golf carefully chooses which shafts are suitable for re-installing in today's golf clubs. Condition of the tip section is of utmost importance,and ultimately determines the shafts integrity. Spargo Golf pays close attention to age of the shaft, condition of the graphics and signs of usage. No shafts with questionable tips and appearances are saved. On occasion, Spargo Golf will inventory discontinued shafts which have a higher request rate i.e.- RCH 60 series from Callaway and Cleveland Launcher Gold Series from the early 2000's. Customer's can be confident that the shaft pull-out is fully prepared and cleaned to be installed in their golf clubs. It is quite common that many of our shafts are pulled new or with minimal use.
Spargo Golf carefully Pulls, Tip Clean-Abrades, Removes Epoxy in the Shaft Tip and Cleans each Shaft. Upon finishing the Prep process, Spargo Golf Performs Spine Alignment and Marks each shaft's Neutral Bend Point. This added step is performed at no additional cost to the Customer.
Below, follow our "step-by-step process" of our procedure, and following is more details of each 12 steps.
|
|
Carefully remove ferrule. |
Ferrule removed. |
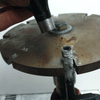
Secure club into Vertical Hydraulic Shaft Extractor. |
Club is clamped in, and ready to be removed. |
|
With a small flame, add heat to the club hosel to loosen epoxy. |
15-20 seconds of heat will break apart the epoxy. |
Keep moving flame 360º around hosel for even heat. |
Gently apply pressure to extract shaft from hosel. |
Hydraulic pump will push the club-head off the end of the shaft. |
|
Remove club-head, set aside. |
Newly pulled shaft, still with epoxy residue on tip. |
Clean-Abrade tip of old epoxy with 1”x30” Belt Sander with specific high-grit sanding belt. |
Tip is now clean-abraded. |
Using a Tip Gauge ensuring proper diagnosis of tip size. |
|
Carefully drill out old epoxy remaining inside shaft tip preparing for installation. |
Remove Grip. |
Remove all old grip tape. |
Clean all tape residue. |
Apply High-Strength cleaner to entire shaft and inspect for flaws and quality. |
|
Insert shaft into Spine Tool to find Neutral Bend Point. |
Spine Tool clamped in bench vise.
|
When spine is found, mark with an arrow on shaft butt. |
Shaft Preparation is complete and passed Quality Control. |
|


Our Process Explained:
- Carefully Remove Ferrule - Apply a small amount of heat (we use a butane Micro-Torch) to the ferrule. With a pair of pliers (tongue and groove), carefully grab the ferrule and remove it from shaft, it will break apart and fall off.
- Secure club into Vertical Hydraulic Shaft Extractor - Properly clamp the club into the shaft extractor. The round metal plate (as seen in photo) should be directly against the top of the hosel (to which we just removed the ferrule from). This allows the metal plate a good base to "push" the club-head up and off the end of the shaft.
- With a small flame, add heat to the club hosel to loosen epoxy - Using a Micro-Torch, apply heat the the club-head ferrule ONLY (NEVER APPLY HEAT DIRECTLY TO THE SHAFT). Many club hosels are left raw metal, and not painted. This is the area that you want to heat as you wont tamper with the club cosmetics. Remember to always keep the heat moving 360º around the hosel, don't keep it in one place. Heat the hosel evenly on all sides for approximately 15-20 seconds.
- Gently apply pressure to extract shaft from hosel - The hydraulic pump will "push" the club-head up and off the end of the shaft.
- Remove club-head, set aside - handle the club-head with care, make sure it does not fall off the shaft extractor and mark the club-head.
- Clean-Abrade Shaft Tip - we use a 1" x 30" bench-top belt-sander to remove old epoxy. We clean the tip down to the carbon-fiber, removing epoxy ONLY.
- Using a Tip Gauge ensuring proper diagnosis of tip size - to ensure the shaft is ready for install upon delivery, we check to make sure the shaft tip is of the proper size and all epoxy is gone to ensure proper fit for installation.
- Carefully drill out old epoxy remaining inside shaft tip preparing for installation - Inside the shaft needs to be open and clear of debris. When installing the shaft, epoxy needs to be able to "flow" into the tip of the shaft for all the excess epoxy to go. As the epoxy dries and cures, it will expand. If the tip is blocked with debris, the epoxy will push the shaft out of the hosel as it dries, therefore will cure with the shaft sitting shallow in the hosel (and will fly off with a good hit). Having a clean tip, allows the epoxy to expand into the shaft, keeping the shaft within the club-head, having a nice deep installation.
- Remove Grip - with a razor, cut a slit running lengthwise down the grip to remove grip.
- Remove Tape and Glue Residue - with a little heat, warm up the tape to help loosen the residue. You can get the tape off in one piece if you do it good ;)
- Apply High-Strength cleaner to entire shaft and inspect for flaws and quality - A quick wipe down with cleaner will expose any cosmetic issues a shaft may have.
- Spine shaft and find its Neutral Bend Point - This is an added value we do to all our shafts. Altho a shaft is round, they are all manufactured to bend one way. Finding the spine shows us how to install the shaft on the spine/bend-plane that allows for the most consistent shaft performance. The shaft should bend back-and-fourth on the same path or plane. A poorly built club will bend and loop, rather than bend back-and-fourth.
Leave a comment
Comments will be approved before showing up.

Follow
Club junkie? Give us a follow, we've got the good stuff...
Sign up to get the latest on sales, new releases and more …
Questions? Call Us at the shop! 401-946-4653
© 2024 Spargo Golf.
Custom Clubfitting Center
Ecommerce Software by Shopify